Our Entryway Needed a Soft, Welcoming Makeover and Here’s What We Did
For the longest time, our entryway was simply the place we walked through every day without slowing down. It had a small set of steps leading up to the door, plain and open on both sides with no border, no railing, and nothing to mark the edge. At first, I thought of it as a…
For the longest time, our entryway was simply the place we walked through every day without slowing down. It had a small set of steps leading up to the door, plain and open on both sides with no border, no railing, and nothing to mark the edge.
At first, I thought of it as a simple design choice from the previous owner, something we would eventually decorate or improve once we settled in. But it wasn’t until our girls became more active that the simplicity of those steps started to feel unsafe.
They loved running down the porch, chasing Milo, or hopping down one step at a time. There were more than a few close calls where a foot slipped or someone landed off balance, and each time my heart jumped into my throat.
Daniel saw it too, and one afternoon he said, “We need to do something to make this safer before someone really gets hurt.”
Building a Border That Made Our Entryway Safe and Beautiful
Daniel took the lead on the construction part, but we planned the design together. We wanted a place safe for the girls, strong enough to last for years, and gentle enough to look like it belonged to the house, not like we added it in panic.
Materials We Used
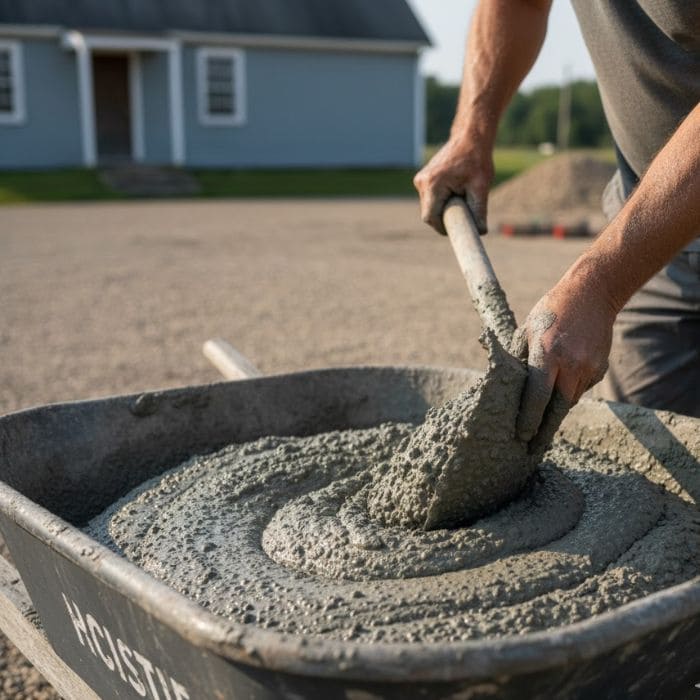
- Cement mix (four 60-lb bags)
- Concrete pavers in a soft beige tone
- Metal edging stakes for reinforcement
- Exterior-grade adhesive to secure the pavers
- Sealant to protect the cement from moisture and stains
- A level, trowel, mixing bucket, and gloves
Daniel measured the steps carefully, each one was 38 inches wide and 7 inches tall and decided to build a low border along both sides, about 5 inches high, just enough to mark the edge and prevent small accidents.
He mixed the cement on a mild Saturday morning, and I still remember the steady rhythm of his trowel smoothing the surface while the girls watched from the porch with their little toy tools, pretending to help.
How We Built It
- We cleared the edges of the steps and leveled the ground so the cement would sit evenly.
- Daniel poured the base layer of cement and shaped it into a narrow ledge running along both sides of the steps.
- While it was still wet, we pressed the pavers gently into place to give the border a natural stone look.
- After the cement set, we used adhesive underneath each paver to add extra strength.
- The next day, we applied a clear sealant to protect everything from weather and everyday wear.
The Total Cost
- Cement: $24
- Pavers: $46
- Adhesive + Tools: $18
- Sealant: $12
Total: $100. When it was finished, the border looked like it had always belonged there. At first, I thought that it must be heavy or forced, but it framed the steps in the softest way, giving just enough shape to guide little feet safely down to the walkway.
Planning Seasonal Decor
Once the border was built and the entryway felt stable and welcoming, I started dreaming about how to decorate it throughout the year.
Independence Day
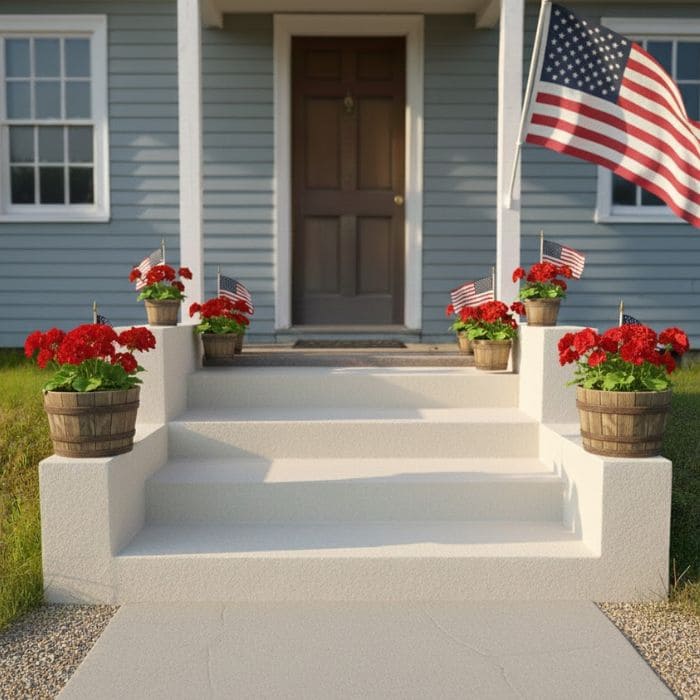
On the week of July Fourth, I place small American flags in short wooden pots lined along the steps. The girls help me choose bright geraniums and we cluster the pots in small groups. The border Daniel built keeps everything neatly tucked in place, even when the summer breeze picks up.
Halloween
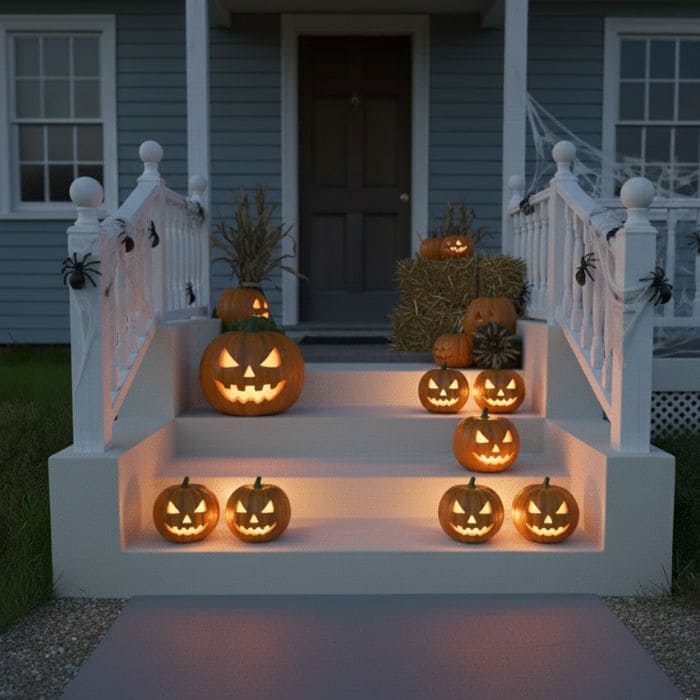
Halloween might be the holiday when the entryway makes us smile the most. We place pumpkin lanterns on each step, running them up both sides so the whole walkway glows at dusk.
The girls love arranging them, making sure each pumpkin has its own personality. Milo, of course, always thinks the pumpkins are new toys and sniffs every single one.
Christmas
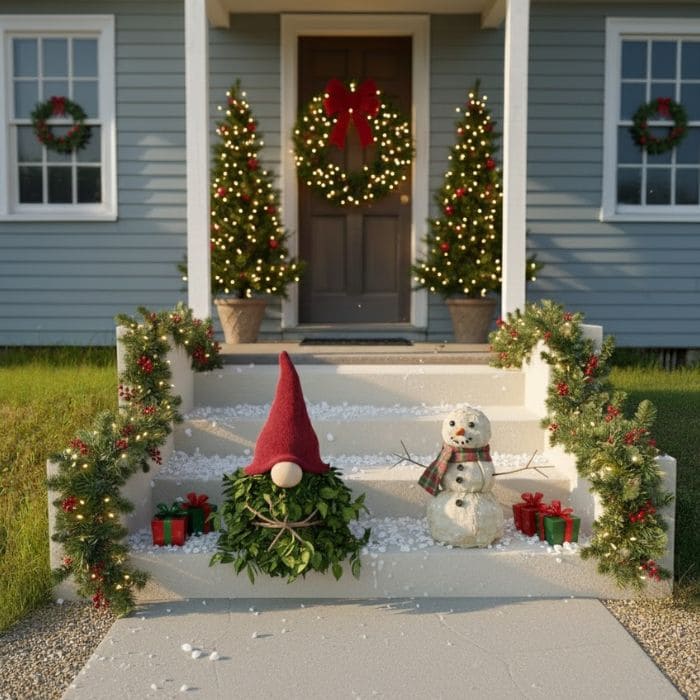
Christmas decorations always feel special here. Using fresh holiday greenery from the market, we craft a small gnome together with a soft hat, a felt nose, and bundle of greenery that fills out the body. It sits right at the bottom step as if greeting everyone who visits.
Some years, when the weather is cool enough, we even shape a snowman out of cotton batting and old white sheets, giving him a scarf and tiny twig arms. He doesn’t melt, and he makes the girls laugh every time they walk outside.
Each season brings its own rhythm, its own colors, and its own chance to make the entryway shine. And even beyond the big holidays, we always seem to find small reasons to dress up the entrance and make it feel lively.
Sometimes it’s as simple as placing a basket of fresh clippings from the yard or adding a small wreath the girls and I make together from whatever branches or flowers are in season.
Other times, we decorate for occasions that matter only to us like the girls’ birthdays, the first cool evening after a long stretch of summer heat, or the start of the school year when everyone needs a little encouragement at the door.
Daniel loves helping me come up with new ideas, especially on holidays that don’t usually call for outdoor decorating.
For Valentine’s Day, we’ve hung little heart-shaped cutouts the girls made from construction paper. On Easter, we’ve placed soft pastel baskets filled with faux eggs along the steps. In autumn, we gather fallen leaves and tuck them around potted mums to give the entrance a warm, earthy feeling.
These little decorations don’t take much time or money, but they bring a cheerful energy to the space and remind us that home is a place meant to be celebrated.