How an Old Map Became the Wallpaper That Changed My Laundry Room
Every home has that one room you visit often yet never truly see and in our house, that room was the laundry room. One afternoon, while cleaning the backyard barn with Daniel, I saw a rolled-up tube tucked behind an old toolbox. When I pulled it out, the paper felt thick and worn, the edges…
Every home has that one room you visit often yet never truly see and in our house, that room was the laundry room.
One afternoon, while cleaning the backyard barn with Daniel, I saw a rolled-up tube tucked behind an old toolbox. When I pulled it out, the paper felt thick and worn, the edges slightly frayed, and the printed colors had softened with time.
It was an old map, a large, vintage world map we bought years ago when we lived in North Carolina, back when we were still dreaming about places we wanted to visit someday. Somehow, over the years and through our move to Florida, it had slipped from our everyday life and into storage.
As I unrolled it right there on the barn floor, the muted blues, dusty greens, and aged browns looked strangely beautiful against the sunlight.
The thought arrived without warning: “What if this could become wallpaper in the laundry room?”
Preparing the Map and the Wall
The laundry room wall I wanted to cover was small, not even a full wall, more like a narrow stretch between built-in shelves and the dryer. It measured 45 inches wide and 68 inches tall, which meant I would need to piece the map together carefully.
The map itself was huge, almost 50 by 70 inches, giving me enough margin to trim without losing important areas.
I began by flattening the map overnight using heavy books at each corner. The next morning, I lightly sanded the wall in the laundry room to remove old paint sheen and wiped it clean with a damp cloth.
I didn’t need industrial wallpaper glue; instead, I mixed a simple paste using equal parts flour and water.
Cutting, Positioning, and Gluing the Map
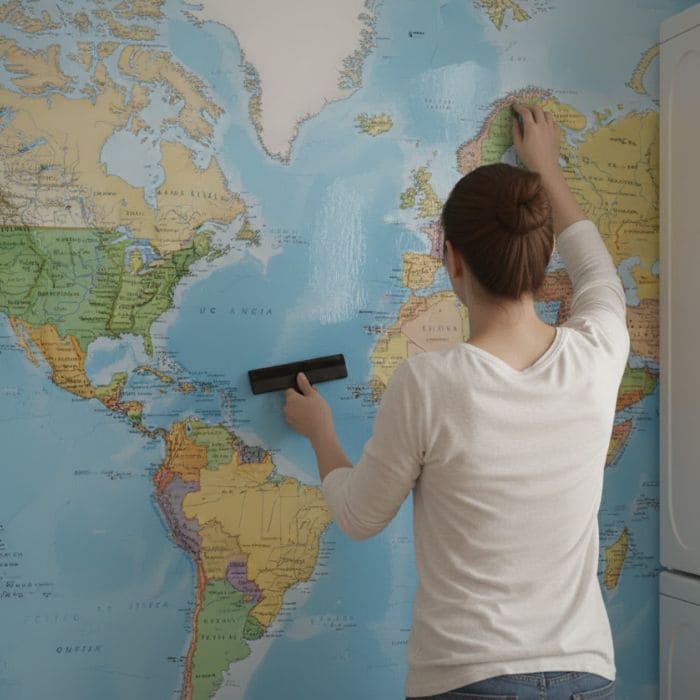
The trickiest part was choosing which parts of the map to feature. I placed it against the wall several times before deciding that I wanted the Atlantic Ocean in the center, framed by the continents on both sides.
Something about the open water felt calming, a small, unexpected sanctuary in a room dedicated to cleaning and routines.
With Daniel’s help, I marked the center of the wall and lined it up with the map’s center.
We started gluing from the top down, smoothing gently with a soft cloth to prevent bubbles. The paper had softened overnight from humidity, making it pliable but delicate, so the process required patience.
I trimmed the edges carefully with a craft blade, letting the map wrap around the corners just slightly so it felt integrated rather than simply placed.
Decorating Around the Map
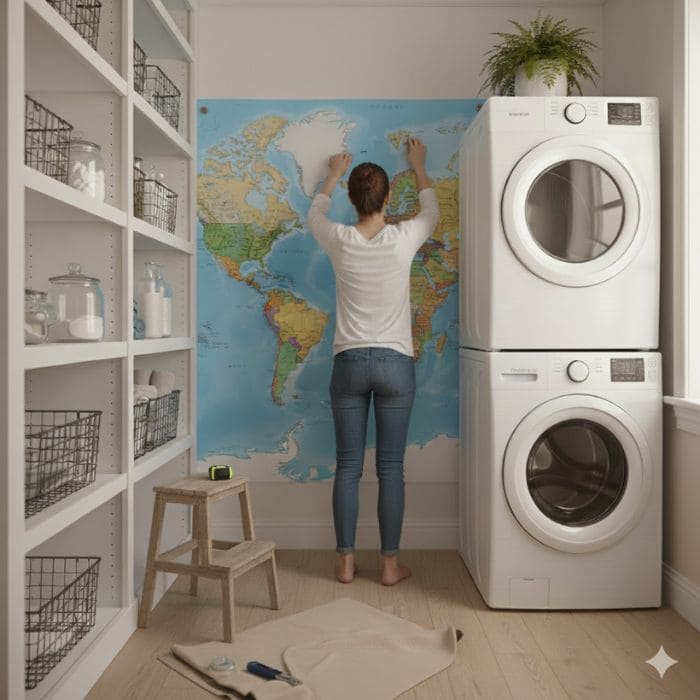
Once the wall was finished, I kept the rest of the laundry room simple. I placed a small wooden shelf above the washer with woven baskets for detergent, a plant that thrives in low light, and a glass jar filled with clothespins.
Sometimes, early in the morning, when I start a load of laundry before everyone wakes, I stand for a moment and look at the map.
Florida sits in the lower corner, small and familiar, while the rest of the world stretches upward and outward, reminding me that even the most ordinary rooms deserve a bit of wonder.
These Little Tips No One Tells You
Working with an old map taught me far more than I expected. Vintage paper responds differently to humidity, pressure, paste, and even temperature shifts, especially here in Florida where the air can feel damp even on a clear day.
If you plan to try a similar project, these are the details I wish someone had told me before I began.
1. Vintage paper absorbs moisture faster than you think
When I first tested the paste on the back corner of the map, the paper softened almost instantly. Older paper behaves differently from modern poster prints; the fibers loosen with even the smallest touch of moisture.
This means:
- Use very thin layers of paste. You should barely see the sheen on the wall.
- Smooth gently with the palm of your hand or a soft cloth, never a scraper, which can drag and tear.
- If your map has folds from years of storage, expect them to relax slowly rather than immediately. Let the paper settle into the wall naturally.
Humidity also causes the paper to stretch slightly. I noticed the map became a tiny bit longer after the first few minutes on the wall, so leaving a small margin around the edges helps keep everything aligned.
2. Always test paste on a hidden corner before committing
Vintage inks vary. Some maps from older decades were printed with inks that feather or blur when touched by water. Before brushing paste behind the entire piece, I dabbed a tiny amount on the lower edge, waited a minute, and checked for color bleeding.
Mine held up well, but testing gave me peace of mind, especially when working with something sentimental.
3. Work from the center outward, not top to bottom
This is a detail I learned only after lifting the map off twice to reposition it. If you anchor the very top first, the weight of the paper pulls downward and fights you.
But when you align the center and smooth outward in all directions, the map stretches evenly and lands more naturally.
It also helps control air bubbles. Any small bubble that appears near the middle can be lightly pushed toward the edges while the paste is still wet.
4. Leave space around outlets, shelves, and corners
In my laundry room, the wall had a narrow corner and a small utility box.
Instead of forcing the map to bend sharply, I cut tiny slits along the edges to allow the paper to fold softly without tearing.
5. Sealing is optional, but Florida weather convinced me to do it
A week after the map dried completely, I brushed a very thin coat of matte Mod Podge over the surface. Not to give it a glossy finish, but to protect it from humidity, fingerprints, and the occasional splash when someone transfers wet clothes.
You should use the softest brush you own to avoid streaks, work slowly in long, continuous strokes and apply just enough to coat as too much will darken the paper.
6. Expect imperfections
My map has a small wrinkle near the bottom left corner where I hesitated for a second too long. At first, I considered redoing the entire wall. But after stepping back, the wrinkle looked almost like part of the map’s original age.
If your map creases slightly or the edges soften more than you planned, consider it part of its charm.